Tuesday, December 06, 2011

Creativity: The Road to Curiosity


After reading a blog post at the Esri Education Community today, I offer my thoughts to the question, “Is curiosity cool again?”

Curiosity, much like critical thinking and analysis, is an elusive quality...tough to teach and challenging to elicit from teenagers.  I’m not sure that curiosity became “less than cool,” or if we stopped allowing opportunities for it in our classrooms.  Test-driven environments around the USA squashed many educators’ plans for creativity and enlightenment.  Having taught in heavily scripted and monitored field, English Language Arts, I know that it’s a challenge to nurture curiosity and creativity when the “rules” seem so regimented.  I found that exploring my creativity offered more curious moments which lead to the essential skills of critical thinking and analysis that we all seek.

Some suggestions to get you there:
1. Offer your students options.  When students have more than one choice for assignments, they tend to engage more. They will be thinking about what they know and how to implement that knowledge...so sneaky of us educators!

2. Show your students another “side” of the issue.  Perhaps you might look into something scientific in English class or do a bit of written explanation in Math class.  Catch them off guard and present them with the unexpected...they’ll be curious! (Perhaps wondering what you were thinking...but curious!)

3. Get their ideas.  Gather students before a unit begins and find out what they want to know, what they wish they could do instead and what they enjoy.  Then take those suggestions and find the “interesting” moments in the curriculum to show them most of the world is connected.

Showing students connections is a powerful tool to teach them how to look for patterns, to communicate their ideas and to encourage them to explore beyond the boundaries of the textbook.

Sunday, October 30, 2011

Where Is Your Next Adventure?

I'm gearing up for Geography Awareness Week 2011 with an emphasis on the theme: Explore the Adventure in Your Community. The folks over at The Geography Collective have created cool MISSIONS to get you out and about...exploring your community.  Also, Daniel Raven-Ellison, one of their geographers, is stopping by the NCGE Webinar program to show off what they're up to!


If you want to get outside and discover something new, try these GPS-enabled activities with your students, family and friends!


If you'd like lesson plans, check out Going Places with GPS by Roger & Anita Palmer.


Bottom line, get out in the fresh air and explore your world!


Monday, October 24, 2011

The Great Pumpkin Harvest


It just wouldn’t be fall without pumpkins and great stories.  One of my favorite stories is the one made famous by Charles Schultz.  Linus van Pelt tries to convince his friends that The Great Pumpkin “rises out of the pumpkin patch that is the most sincere.” http://www.youtube.com/watch?v=xiSIQzwIPzQ Another website with good information about the story is http://peanuts.wikia.com/wiki/It's_the_Great_Pumpkin,_Charlie_Brown.  


I believe this is an opportunity to talk about vocabulary, science, storytelling and just have some fun!
What is a "sincere" pumpkin patch? Where might that pumpkin patch be?  


View Larger Map


Lesson idea: Have your students explore the data, then add points to the map to predict The Great Pumpkin's journey to the most "sincere" pumpkin patches.  Older students may be interested in exploring the data behind the map and the math involved in the statistics.


Where do those pumpkins come from anyway?  If you eat the seeds will they grow in your belly?  Great agricultural lesson for elementary students illustrating stages of the pumpkin: http://aitc.oregonstate.edu/resources/pdf/activity/great_pumpkin.pdf

And finally, a pumpkin post wouldn't be complete without my favorite pumpkin pie recipe:
Step 1: Buy a can of Libby’s Pumpkin. You can’t buy any other kind or you can’t do Step 2! 
Step 2: Follow the recipe on the back or use the online version. http://www.verybestbaking.com/recipes/18470/LIBBYS-Famous-Pumpkin-Pie/detail.aspx
My secret: Add Vanilla extract and nutmeg to the mix (at least a teaspoon of each).
My favorite pie crust recipe from Anne Thornton: http://www.foodnetwork.com/recipes/anne-thornton/mama-thorntons-peach-pie-recipe/index.html (or get those ready made ones from the store).


Wednesday, September 21, 2011

Q & A: Do you have any maps of world governments?

I often get questions about where to find maps on various topics.  This week a colleague, who teaches elementary students-third grade, asked about incorporating maps of world government types with their study of democracy and the three branches of US government while comparing it to Ancient Greece.


Here's what I found:


A nice lesson plan (http://greece.teachingmatters.org/lessons/1-2 ) with a great role playing activity...very practical.


A types of government worksheethttp://www.cvhs.cv.k12.ca.us/STAFF/kcassidy/World0708/RiseDemocracy/Typesofgovtchart.htm (Also great for AP Human Geography or Government class)


And an interactive maphttp://chartsbin.com/view/6kx (This site is full of great data!  The types of government is just one data set.)


Happy mapping!

Thursday, September 08, 2011

Telling Your Story with Confidence

How many people feel like they aren't good writers? 
"English isn't MY subject!"  
"Do I have to write it in a sentence?"  "Couldn't I just tell you about it!"  
"I hate writing!"  
It's quite common for people to struggle with communicating their stories, opinions and research in written words and then translate that frustration into a crippling lack of confidence.


A dear friend's young son has that impression, but a wise teacher had him dictate his story, showed it to him in print to begin to build his confidence as a great story teller.  Now, don't worry, he won't be dictating all his stories.  Certainly, he will be doing plenty of writing in his academic life, but what a great start.  His mom shared this site: http://edina.k12.mn.us/concord/teacherlinks/sixtraits/sixtraits.html.  It's a nice resource for beginning...you have to start somewhere!   


I was talking with one of my high school students that I tutor.  Her assignment was simple really.   Describe what the author was saying...no fancy analysis needed, just write a summary.  She had such a challenge starting.  My least favorite words came from her mouth, "I can't."  Like my friend's son, she could tell me everything that should have been on the paper, but thought she needed lofty vocabulary and perfection on the first try.  I told her to just get it out. The first one's a draft...no pressure.


Step 1:  understand the assignment
Step 2: make a list of thoughts, cool words, ideas...anything related to the assignment/topic
Step 3: make some sentences with those thoughts without concern over spelling and how great they sound.
Step 4: put the sentences in order and begin to edit them...dress them up a little.
Step 5: make a more final product...dressed up sentences in the proper order and check the picky stuff like spelling and punctuation.


After a bit of practice, you may not need all the steps, but if you're stuck in "I CAN'T" then you have to start somewhere...work the steps.  This technique can be helpful for students with disabilities who need assignments in smaller bits, not just the reluctant writers.


There are more writing & curriculum ideas on my website too: www.barbareeduke.com/downloads/downloads.htmIf you have ideas or sites worth a look, please share!  Don't be afraid of writing...it's just telling your version of the story.

Friday, September 02, 2011

Teachable, Mappable Moments: Weather

Although weather can pose some challenging moments, I'm struck with the idea that we have not only a mappable moment but a teachable one as well.  In our recent past, the US dealt with Irene and a substantial earthquake in Virginia.  The weather keeps coming!  I live in southeast Louisiana where we're watching now TS Lee get ready to pound us with rain, rain, rain.  While the folks here make preparations for possible flooding conditions, particularly on lakes, canals and rivers, the rest of you out of harms way can look at the maps of it all. I created a map from a myriad of weather related data that's shared within www.arcgis.com.

Take the map below (at ArcGIS online: http://explorer.arcgis.com/?open=ba5a0959692b4104b0790c8ceafb8547) We can see real time warnings, wind direction, etc.
Check out many teachable, mappable data sets in the online library and make a map!


View Larger Map

Monday, August 22, 2011

Boldly Going Were No Maps Have Gone Before


Some critics say the online mapping tools and free mapping tools are like chasing a moving target.  Well, warm up your running shoes and pack extra arrows in your quiver, because the latest version of ArcGIS Explorer Online is worth the effort to chase it down!


Those of you who have been involved with the effort to integrate geospatial technology (GIS, GPS & Remote Sensing) into the classroom environment for the last 10 years or so know we've been through many changes in terms of viable solutions.  Didn't you love ArcVoyager and it's prescribed modules...so nice, and then AEJEE with it's closer-to-the-real-thing features.  We began to embrace ArcGIS Explorer (now ArcGIS Explorer Desktop) virtual globe with it's improving features.  As new tools came along, old ones die away...rules change.  The pursuit could be frustrating or invigorating depending on your tendency towards a glass half-full or half-empty mentality.  As things changed, you had to remember that these tools weren't always built with educators and classrooms in mind, rather designed for business, industry and the general public.  The creative educators were utilizing the cools tools.  Well, the game is changing again.  Gone are the concerns for whether you have a Mac or a PC! (cue those hilarious commercials http://www.youtube.com/watch?v=C5z0Ia5jDt4)  Run it all in your internet browser!  Woohoo!


So what's possible?  Queries and shapefiles and map notes...oh my!


I've created some examples and posted a collection of links to maps and data that are residing in my account space (for free) at arcgis.com. http://www.barbareeduke.com/mymaps 
There are samples of old lessons that are still on my website and in ArcLessons as well as some new ones, such as T.S. Spivet and Plessy v. Ferguson.  


I think the real treasure in these tools is more flexibility. As an educator, I can create the beginnings of a map and prompt students with the expected handouts; then, my students access that map, add more data and analysis to it AND...(drum roll, please) create a presentation using the built-in presentation features to assess their knowledge, thinking and communication skills.  We're teaching many more skills than GIS with this tool and its features.  We expose students to course content, subject analysis, directed research, critical thinking, problem solving, story telling, persuasive writing and public speaking.  I challenge you to find me a tool that does all of that...in a web browser!


There are great tips and information at the Esri blogs for each product.  Also the Esri Education Team's blog has great educational insights and some step-by-step entries on using the tools as well as implementing the tools.

Check out the blogs: 
Esri Education Community
http://edcommunity.esri.com/
ArcGIS Explorer Desktop
http://blogs.esri.com/Info/blogs/arcgisexplorerblog/default.aspx
ArcGIS Explorer Online
http://blogs.esri.com/Support/blogs/arcgisonline/default.aspx

Thank you to Bernie Szukalski & the Esri team for bringing us a great set of tools!

Thursday, July 28, 2011

Thinking about "Above and Beyond"


The message here is one that resonates with me deeply.  Seems like I've been fighting for curriculum and educational experiences to go "above and beyond" for more than 20 years.  I hope the public as well as key school personnel get this message, but just as the film portrays...how many folks will see it and say,  "We should have kids build stuff!" or "Let's get rid of all teachers that aren't pushing this kind of creativity." or "Let's have a school contest."  Those folks would be missing the mark also, not with malice but off the mark the same.

A smart guy I know, Charlie Fitzpatrick, said, "It is always far more impressive watching people do powerful things with simple tools than doing simple things with powerful tools."  The kids in this allegory certainly do that and more.  Their use of simple tools produced powerful things, impressive results.  I submit that the real tools are those that are highlighted less often.  What if the "tools" we used implicitly were things like creativity, spatial awareness, diversity, compassion, teamwork and persistence?  We might come up with a recipe for success that includes the perfect ingredients AND the best tools for the job!  Perhaps we might all go "above and beyond"!

Thursday, June 30, 2011

Q & A: How Do I Share an Online Map within my Blog?

I recently met a great group of teachers in the Dallas area.  We spent the afternoon together talking about geospatial technology.  They were excited about online maps and were intrigued about the possibilities.  One teacher was going on some world adventures this summer and wanted to document the journey so that she could revisit it with her students.

Question: She said, "How do I share an online map within my blog?"

Answer: (PDF of these instructions)

Go to http://www.ArcGIS.com  (Be sure you have an account for the site so that you can save your map.)
Click on Make a Map.
Click Add. Select Create Editable Layers.
In the Add Features box, choose what you want to add to the map, a point, line or polygon.
Click the type of feature you want to add.
Click on the map where want to put the feature on the map.
Now edit the feature (give it a title, add a description, put a link to a picture online, a pertinent website, etc.) Click on the item on the map to get this box.

Once you’ve added all the details to your map, save the map your online arcgis.com folder.
Now you’re ready to share your map.  Click the Share link.

Turn on the Share with everyone (public) so that the Embed in Website button is active.
Click embed in website and you’ll get the embed code to copy and paste into your blog entry.

As you have more points, lines or polygons to add to your map, you’ll just login and edit the original map, save…adding the new stuff each time.  The embed code will not change.

Tuesday, May 03, 2011

Thank a Teacher

Happy National Teacher Appreciation Day!

My thankful story begins in First Grade with Mrs. Pate.  She was kind and sensitive to the unique personalities and abilities in her classroom.  She encouraged me to move beyond the boundaries of first grade reading and exposed me to my first chapter book, Charlotte's Web.  Mrs. Bankester in Second Grade taught us with music...we sang our way to learning.  Mrs. Carpenter made multiplication facts solid as a rock in Third Grade and showed us that learning could be fun and interactive.  Mrs. Bretz made me feel comfortable in a new school in Fifth Grade.  Mr. Duren and the band programs made school matter for me.  Because of his dedication, I saw potential in myself and found confidence in an intimidating school environment.  And finally, from my Baylor days, Dr. Wortman gets the nod for most influential.  He took a chance and believed in me when I couldn't see a way.  For me, the most memorable teachers are the ones that helped build my confidence and made me feel like I mattered, that I had something important to share with the world.

For all my teacher friends, don't underestimate the power you have on young lives.  I'm blessed to have known so many wonderful students and thanks to inventions like Facebook...they have found me again.  What a lovely gift to know that little me made a difference!

And to those of you who aren't "officially" teachers, don't count yourselves out...we are all "teaching" lessons in life to the people we work with, the business that you support, or the customers that you serve.  Who "taught" you something valuable and positive?  Who do you "teach" everyday?

So...thanks to all my "teachers" and teachers!  I'm a better person because of you!

Friday, April 22, 2011

Q & A: Adding Charts and Graphs to My Layout

Question: How can my students add graphs and charts to their layouts in ArcGIS 9.3?

Answer:

Adding Charts and Graphs to an ArcGIS (9.x) Layout
1.       1. Create the Graph
a.       Click the Tools menu, select Graphs, select Create.
b.      There are two customization screens.  On the first one you primarily select the information to be represented. The second customizes the look of the graph.
                                                               i.      Select information for your graph.
1.       Type (bar, line, area, etc)
2.       Select the layer that the data comes from.
3.       Choose the value field that you want to be displayed on the graph
4.       Click Next.
5.       Add a title, footer, legend title, etc.
6.       Click Finish. The graph appears in a floating window.

2.       2. Add the Graph to your Layout
a.       Be sure the graph looks like you want it to look.  The graph will be added to the layout, “as is”.
b.      Right-click anywhere (except the X) on the floating window with the graph. 
c.       Select Add to Layout.
d.      Now your graph is a graphic element on your layout that you can manipulate.
3.     3.   Changing the Graph – Perhaps you realize the first try at the graph isn’t exactly what you wanted.  No worries.  This gets saved as part of your map document.  To edit this graph again.
a.       Click Tools, select Graphs.
b.      Select your graph from the bottom of the menu.  You get the floating window again.
c.       Change the physical size of the window and you’ll change the data representation.
d.      Double-click on the window to edit the data represented.
e.      Add your updated graph to the layout and delete the previous one.
                

Wednesday, April 20, 2011

Q & A: Adding Pictures to your ArcGIS Explorer Map

QuestionHow can I insert a personal photo into a pop-up for a feature I've added to my map?  


Answer:
First, know which ArcGIS Explorer you are using, DESKTOP(AGXD) or ONLINE (AGXO).  The rules are different for each interface.


Second, here are the rules...

  • Save your personal photo in an online service, such as Picasa.  It needs to be accessible from the web.
  • When you have saved your photo online, you can edit the pop-up window. This way it doesn't matter which interface you use (AGXO or AGXD).
    • AGXD: Just click that little pencil icon in the bottom right corner.  Drop in the URL of your photo.  Save it and you're all set.  You can also add a local path to a photo but remember you'll need to open the map document on that same computer for it to show up. (see http://blogs.esri.com/Info/blogs/arcgisexplorerblog/archive/2009/09/18/adding-photos-to-your-map-using-notes.aspx)
    • AGXO: Click the create features button, place the feature (point, line or polygon) on the map, click the feature, in the bottom right corner select edit and edit pop-up.  Drop in the URL of your photo on the image URL line. Click OK.
  • You can add photos in ArcGIS Explorer Desktop (AGXD) to be used in a presentation, a URL in a pop-up and to customize the symbols(markers).
  • From Esri AGX Blog on How to customize a symbolhttp://blogs.esri.com/Info/blogs/arcgisexplorerblog/archive/2010/06/03/Creating-custom-point-symbols.aspx
  • My version of the instructions: You can customize a picture to become a marker...instead of one of the stock icons.
    • right-click the place name in contents
    • select symbols
    • select manage symbols
    • browse to your picture
    • ok
    • then on the appearance tab, select the new picture as your symbol

    In the example picture above, I've used AGXD to make my marker unique and added a URL of a personal photo in the pop-up window for that point feature.

    It's really easy and offers some great opportunities to share information geographically!

Thursday, April 14, 2011

Twinkies: A Reason to Use Maps in PE Class

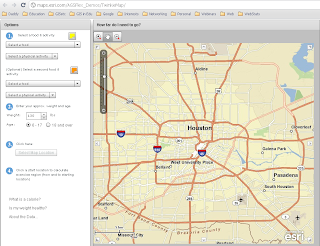
Have a look at this cool map interface!  You can map snack foods as well as the nutritional choices as they relate to calories and physical activity.

What a great way to get students involved with the outdoors and have a snack!

Check it out at http://maps.esri.com/AGSFlex_Demos/TwinkieMap/!

Monday, March 14, 2011

Caching into Writing

Geocaching isn’t just for science class or the serious geography geek!  A cache is simply a hiding place, and caching is hiding something like a treasure.  Nature is full of treasures waiting to be explored.  A popular movement called “geocaching” gets folks outside with their GPS units to find treasures hidden by other geocachers.  If you haven’t tried it yet, it’s great fun! (www.geocaching.com)  Folks are geocaching all over the world!
Many educators are taking that idea to the classroom to do campus investigations.  Now you might expect that it’s the science teacher out looking at nature, but surprise your students in English Language Arts class with an outdoors writing assignment!  Realizing that not all classrooms are created equally, here are some low-tech options as well as the spiffy high-tech ones.  Either have students locate specific cached items or let them explore the landscape for surprises.  Anyway you do it, get creative and allow the students to explore their creativity.

Low-Tech
  • Create a map of your site with destinations.  Use a hand-drawn map with destinations or use a tool like Sketch-A-Map (http://edgis.org/sketch) to create your map for students.
  • Students can create a poem or story based on the destinations on the map.  Nature is an excellent way to pull more adjectives out of a student.  I used a similar activity with my students in my book, Reading, Writing and Thinking around the Globe: Geospatial Technologies for English Language Arts Classroom and Beyond (www.barbareeduke.com) where students create topographic and geographic definitions for words. Visualizing vocabulary can help cement those words into a student’s personal dictionary.

High-Tech
  • Using your school’s or a set of loaner GPS units (www.gisetc.com). Set up waypoints with caches.  Perhaps the students find words, phrases or starters for writing assignments.  They could take photos and return to the classroom with real experiences.  Don’t think that you have to have green spaces and trees to make this work.  Urban explorations could be quite powerful as well!  Perhaps tell the stories of graffiti or buildings changing over time.  
  • Perhaps you decide to pair the GPS units with cameras (a reason for kids to use those cell phones) to create a photo essay.  Just ask National Geographic if photos have a story to tell!
  • Another option is to use a smart phone application.  I have a GPS app on my iPhone (MotionX GPS) that integrates a picture and text with my waypoint.  I can email this waypoint with the photo and text attached, and then view it in a virtual globe application like ArcGIS Explorer (http://www.esri.com/arcgisexplorer) or Google Earth (http://earth.google.com), another educational reason for kids to use that cell phone at school. Because applications like ArcGIS Explorer are equipped with a simple presentation creator, as a next step, you could combine all the stories and photos for a class-wide virtual tour. 
  • For the more adventurous, you might like to check out a project called “confluencing” (www.confluence.org).  This calls for a GPS unit and some planning.  Check out some of my adventures with my friend, Dr. Joseph Kerski. (http://www.confluence.org/confluence.php?visitid=14853). The post-adventure writing is the star here.  You could take this same approach with your geocaching explorations as well, a detailed story of who, what, where, when, why and how is great practice for all those persuasive writing assignments!

The moral of the story here is: expand the borders of your classroom.  Think beyond the text book and computer screen.  Engage students with outdoor spatial experiences and watch their writing transform!

Thursday, February 17, 2011

ArcGIS Explorer Online How-To Guide

If you're searching for a nice how-to document on using the Esri ArcGIS Explorer Online tool, then point your browser over to the University of Redlands.  They have done a nice job with most of the basic functions that you would want to use with students.  http://www.institute.redlands.edu/lens/downloads/guides/ArcGIS_Explorer_Online_extended_quickguide.pdf

Tuesday, February 08, 2011

The Left-Handed Chocolate Caper for ArcGIS Desktop and Explorer

My students loved doing GIS "puzzles"!  I have created an update to the a classic puzzle designed by the Esri Ed Team in 2000, "The Left-Handed Chocolate Caper."  Students use demographics, average temperature, food, elevation and more clues to find the best search area.


"Hishe Penn traveled the world in search of exotic foods. Two weeks ago, he called his office with exciting news. He found a variety of cocoa bean whose molecules formed opposite the usual way. This "left-handed bean" was actually much more nutritious and had all the flavor of a regular cocoa bean.  He was excited about creating a new brand of chocolate products.  Much to his surprise, Penn had been followed by a rival scientist, whose henchmen grabbed Penn and held him captive, hoping to steal his discovery." 


Find Penn and give the world better chocolate in time for Valentine's Day!

Wednesday, February 02, 2011

NCGE Webinars: Feb. & March

We're excited about the new year of live webinars!  We are endeavoring to include all facets of NCGE into the program. The Webinar Task Force encourages you to discuss with your committees great additions for our program.  

Participation is so simple.  Just use your internet browser to go to the webinar address, type in your name, watch, aks questions and share!  Don't miss the exciting sessions coming this spring!
Coming Attractions
Ask the Webinar Team
Have questions?  Just zap us an email at webinars@ncge.org.
 
Landscapes to Learning 
Monday, February 21, 2011 at 7pm EST/6pm CST 
Bob Lang, FRGS C.Geog of  King Edward VI Five Ways School, Birmingham, UK
Bob Lang
Art, Geography and Travel in the Classroom
Don't miss this exciting session on using geospatial technologies, photography and data! There is something for everyone in this very interactive session. This webinar will look at an innovative cross-curricular project based around Geography and Art and a school's established International link with a school in
Guangzhou. The project uses modern art, GIS and photography via Birmingham's Museum and art gallery and student's photographs and experiences to look at the growth, urbanisation and redevelopment of the cities of Guangzhou and Beijing in China.  Join us for the adventure!

APHG: Gearing Up for the Test
Wednesday, March 23, 2011 at 6pm EST/ 5pm CST
 
Ken Keller, AP Human Geography & U.S. History Teacher at Danbury High School, Danbury, CT
Preparing for the AP Human Geography Test
Calling all APHG teachers and geography teachers! In this session teachers will learn some tried and true methods on how best to prep their students to earn a score of "5" on the AP Human Geography exam. Emphasis will be placed on deconstructing both multiple choice and free response questions. Likewise, participants will learn how to employ best practices related to teaching test taking strategies in the classroom as well as teaching their students some techniques to reduce stress and be more focused when they go to sit for the exam. Ken Keller has been teaching the course since its inception and has been an exam reader for the past nine years.
Other topics planned include: Spatial Cognition, Political Geography and more APHG.  Check the 
NCGE Webinar Program page often for updates.  Also we'll be notifying the membership once a month of all the great developments! 

Monday, January 31, 2011

NCGE Map Gallery Contest

NCGE 2011 Map Gallery Contest
  
The 2011 NCGE Map Gallery Committee invites you to submit a map for display during the 2011 Conference.  All GIS maps are welcome.  The maps will be judged by a panel of peers, with the exception of the People's Choice Award, which will be voted on by the Conference attendees.  The Map Contest will feature two award categories and the winners will be announced at the closing session on Saturday, August 6, 2011.  Please review the minimum requirements and categories carefully when designing the content of your map entry.  

Awards    
Best Cartographic Design (Higher Ed., K-12 & People's Choice) - Awarded to the map that artistically employs the elements of cartography without compromising use and functionality. Maps will be judged on fundamental cartographic principles including figure ground representations, visual hierarchy, color selection, typography, symbology, overall aesthetic appearance, etc.

Best Analysis (Higher Ed., K-12 & People's Choice)  - Awarded to the map that is best designed to display the results of spatial data analysis and presents the information in an unbiased way, allowing the viewer to extract their own conclusions, utilizing the map as a tool.

The three winners in each category will be awarded prizes along with the admiration of their peers.

 
How do you and your students participate?
  1. Create your awesome map.  Size must be ANSI D (22 x 34) or smaller.  Save your map as a *.pdf.
  2. Create your map abstract and collect all the important information.
  3. Complete the submission form online.
  4. FTP your map's *.pdf file to the server.
  5. Meet us in Portland at the NCGE Annual Conference to share with others your excellent work!

 
Map Submission Deadline is May 15, 2011

 If you have any questions about the Map Gallery, please email Anita Palmer at anita@gisetc.com.

Wednesday, January 12, 2011

Q & A: It's All Relative!

Question:
Can I have my students create projects so that everything is "relative"?

Answer:
You can have relativity in a GIS project. You just need to plan ahead.  It's harder to get relativity after you've already created the project.  ArcMap does relativity well when we tell it at the beginning of the project.
Without getting into too many hairy details, here's the simplified, general process:
  1. Plan your folder architecture before you start creating your GIS project.
  2. For example, a good ol' standard is to have a general folder, a MASTER FOLDER if you will, for the whole thing that contains the *.mxd, a folder for images, a folder for links, a folder for metadata and a folder for geodatabases.  Each of those folders contains the individual files(i.e. images has all the *.tiffs and *.jpgs, etc). See attached picture. For educational environments, I add a folder for documents (lesson plans, student handouts, etc.)
  3. Collect and move files into the folders BEFORE you add them to your map document in ArcMap.  You may have a working area that different that your master folder and master map document.  I do this often when I'm still trying to figure out exactly what the final product will become.
  4. Start an empty map document in ArcGIS/ArcMap.  Set all your environmental things (home directory, default geodatabase, document properties, etc).  
  5. Set the "relative" characteristic for your map document. (File, Document Properties, Data Source Options, Store relative path names, Make this the default for new map documents, OK, OK)
  6. Save your *.mxd in it's permanent home folder, the MASTER FOLDER. You're telling ArcMap that all files will "relate" to this location.  It won't care if it's on a hard drive, CD or flash drive.  It just knows to look in it's own backyard.
  7. Now, as you begin to build your map document and do analysis, everything you do goes into this one area (MASTER FOLDER) for the project.  
This process is helpful for your students.  They need good data management skills as they learn how to do GIS. It saves many conversations like "where is the original data?" and "didn't you write anything down?"  We laugh because we've all been there!  In education, transportability (relativity) is important since we may not always be sitting at the same computer.

Tuesday, January 11, 2011

Q & A: Studying Louisiana Wetlands

It's a new year filled with new questions from my GIS teacher friends.  Solving questions and having students go on that quest is so powerful.


Question: I have a GIS student who is interested in learning some things about Louisiana’s water. She is interested in studying wetlands and salinity as a first topic choice. Erosion and river silt problems along the coast would be a 2nd choice.

Do any of these sound reasonable (because you can help us find data sources)? Do you have data sources that might lead her in some other directions?

Answer:  The fine folks of Louisiana have a DVD of state geospatial resources.  
I have a two DVD set from 2007.  It's now available for download at: http://lagic.lsu.edu/geodata/LOSCO/2007_DVD/default_2007DVD.htm.  They have a quick start guide to that data collection also: http://lagic.lsu.edu/geodata/LOSCO/2007_DVD/downloads/2007DVD_Quick_Start_v20071017.pdf

Some other sites that may be helpful: